
| Manufacturer | Dewalt |
| Model | DWS779 |
12" Double bevel sliding compond miter saw
Credit Card info must be left on file
How to Use a Power Miter SawCut trim and moldings so they fit like a glove
 Family Handyman
By the DIY experts of The Family Handyman Magazine
TIME Instant!COMPLEXITY SimpleCOST $100 – $500Video Tip: How to Mark a Board
Mark Petersen, an editor for The Family Handyman, will show you how to properly mark a board before cutting it on a miter saw.
Clean cuts start with a steady hand and a firm grip

Photo 1: Line up the blade with one side of the mark
Lift the blade guard with your thumb and sight down one edge of the blade to align your cut. Caution: Remove your fingers from the switch while you’re aligning the cut. Firmly hold or clamp the workpiece. Then gradually release the blade guard and return your hand to the switch to make your cut.
A power miter saw is one of the best tools to cut tight-fitting joints on all kinds of moldings: window and door trim, baseboard and crowns. With a power miter saw and a sharp saw blade, it’s easy to fine-tune a joint for a perfect fit by slightly adjusting the angle or trimming off a hair’s width.
Be prepared for a startling experience the first time you squeeze the switch on a power miter saw. The saw will jerk and whine as the blade gets up to speed. Listen for the blade to reach top speed before starting your cut. Then lower the blade slowly and steadily through the board until the cut is complete. Hold the saw carriage down in this position and release the switch, allowing the blade to come to a complete stop before raising it. Maintain a firm grip on the workpiece until the blade stops spinning.
Aligning the blade with the cutting mark on your workpiece gets easier with practice. Photo 1 shows how. Cut a little beyond the line, leaving extra length on your workpiece. Test the fit. Then adjust the miter saw angle if necessary (Photo 2) and slice off a little more. Keep a firm grip on the workpiece (with your hand a good 6 in. away from the blade) to prevent it from being pushed aside by the blade. For greater accuracy, clamp the workpiece.
Miter Saw Safety
Power miter saws are simple to use and safe if you follow the precautions and instructions included. Take time to read and understand them. Here are a few of the most important safety precautions:
- Unplug the saw when you’re changing the blade or not using it.
- Keep your fingers at least 6 in. from the path of the blade. Some saws have lines to indicate the danger zone.
- Wear safety glasses and hearing protection when you’re operating the saw.
- Don’t reach under the blade while it’s spinning.
- Let the blade come to a complete stop at the end of each cut before lifting it.
Adjust the angle for a perfect miter

Photo 2: Fine-tune cuts
Adjust the blade angle slightly to fine-tune miter cuts for a tight fit. Nudge the blade adjuster and hold it in position until you tighten the locking handle.
A friend once complained to me that miters cut on his power miter saw didn’t fit, and he wondered if something was wrong with the saw. I explained that miters often don’t fit on the first try, but that he could make them fit by adjusting the angle slightly (Photo 2), as little as 1/4 degree, and slicing off tiny slivers of wood. If the backsides of miters touch, leaving a gap in the front, you can fix it in either of two ways. If you own a compound miter saw (opening photo), leave the angle setting the same but tilt the saw 1 or 2 degrees and recut the miter, removing just a little from the back side. If your saw doesn’t tilt, slide a carpenter’s pencil or sliver of wood under the workpiece to tilt it up in relation to the blade. With practice, you’ll be able to look at a joint and gauge where to remove wood to tighten the fit.
Build a jig to hold crowns and coves

Photo 5: Use a jig for crown molding
Construct a jig to hold crown moldings at the correct angle. Set a scrap of your molding upside down in the jig and mark the position of the stop. Screw the stop to the jig. Place all fasteners away from the path of the blade.
Some trim pieces, like crown, cove and bed moldings, sit at an angle to the wall or ceiling. To cut these, I like to imagine the bed of the saw as the ceiling and the fence as the wall, and position the molding that way. Then you’ll cut the miters like any other trim, without having to make a compound miter. Build a jig to ensure the molding is held at a consistent angle each time (Photos 5 and 6).
Cutting short pieces requires special techniques
Whenever you have to cut miters on a piece less than about 8 in. long, cut them from a longer piece so you can keep your fingers in the safe zone away from the blade. If you need a 6-in. piece of baseboard with miters on both ends, for example, cut one miter on the end of a long piece of base. Then mark for the other miter, change the miter saw angle, and cut off the 6-in. piece while you hold the longer end. Very small pieces fall through the large gap in the fence on many saws and can easily break or be flung across the room. Photo 3 shows one solution. Sometimes it’s helpful to screw a taller wood fence to your miter saw to support wide trim and reduce the size of the space near the blade. The fence has holes that are just for this purpose.
Every brand of miter saw is slightly different. The more you use your saw, the more you’ll get used to its quirks and the easier it will be to get accurate results.
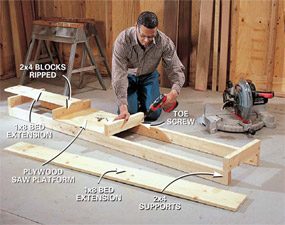
Simple Miter Saw Stand
No matter what type of miter saw you own, a stand that holds the tool at a comfortable working height and supports long pieces of lumber is a must. It doesn’t have to be fancy. The photo below shows one version that’s so quick and easy to assemble that I’d often build one right on the job site. The wooden bed extension on this stand makes it easy to attach stop blocks (Photo 4). If you’ve got extra time, embellish this plan by adding a plywood bottom to form a tray and replacing the 1×8 with a wider strip of 3/4-in. plywood. Set the stand across a pair of sawhorses to save wear and tear on your knees.
Use 8-ft. 2x4s for the base. Cut a piece of plywood about 16 in. wide and the length of the miter saw and screw it to the 2x4s. Rip 2×4 blocks so they’ll support the 1×8 top flush with the bed of the saw. Screw the blocks to the long 2x4s. Then screw the 1×8 bed extensions to the blocks.
Required Tools for this Project
Have the necessary tools for this DIY project lined up before you start—you’ll save time and frustration.
- Hearing protection
- Miter saw
- Safety glasses
Required Materials for this Project
Avoid last-minute shopping trips by having all your materials ready ahead of time. Here’s a list.
- 1 x 4 for sacrificial fence
- 3/4-in. screws
- stock blocks